Friday, September 23, 2011
Create the Wordpress site with own domain total FREE!
Have you ever wanna created the own site? Then you think about blogspot, wordpress.. and choose one of them. Every platform has the strong point. But today I will guide to you who wanna create the own site how to creat one with own domain and own host total FREE with Wordpress!
1. Get your own domain:
There are so many site can do it for you. So here I want to introduce us.cydots.com.

This site has many domains you can get free: yourdomain.us.ms, yourdomain.net.ms…
For example you want to get the domain dot net.ms:

You have to check your domain. Then, if your domain still available, you will must register for it:

So, when you finished steps after that, you got the domain free. Now we register for your free host!
2. Get free host:
There are some the free host provider which you can choose: 000webhost, byethost…
Now I get the free host with byethost.

Frist, you mus sign up to creat account byethost.

When you finish, this will send to your email the activation. You check your mail and click to the activation link. Then, they will send to your mail the information of you host account. So now you have a free host with byethost.
3. Apply your domain to your host:
You had the domain and hosting. Then, you need to apply your domain to your host:
Come back your account us.cydots.com. You click on Domain as this:

Then you click on Nameserver like this:

After that, you type the DNS of byethost and click to submit:

Then, we come back to your cpanel of your host:

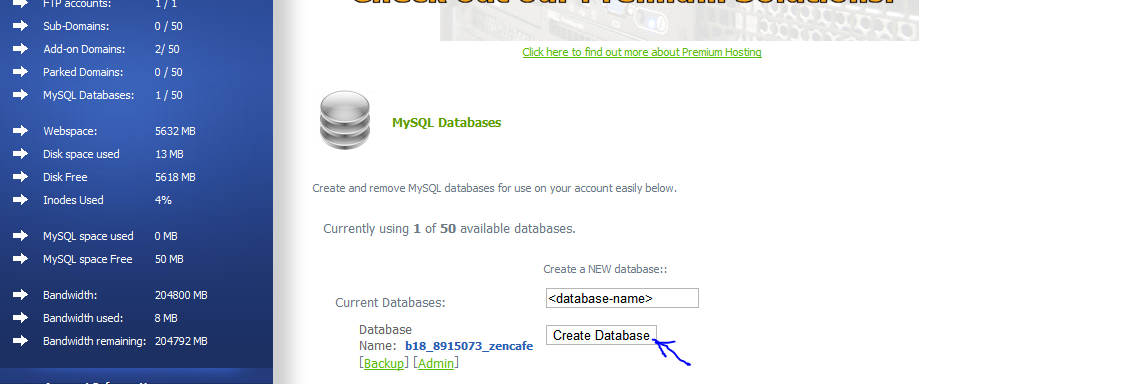
Click on "Addon Domain" for add your domain to host. After that, come back cpanel and creat name of your database:

4. Create your Wordpress site:
Frist, you need to download the Wordpress Platform here.
Then you use winrar or winzip program to unzip this package to your computer.
Open file wp-config-sample.php and rename to wp-config.php then find this below and fill in the value (red text):
// ** MySQL settings - You can get this info from your web host ** //
/** The name of the database for WordPress */
define('DB_NAME', 'replace by your name of database which your created in step 3');
/** MySQL database username */
define('DB_USER', 'replace by your username which used for sign in your host cpanel ');
/** MySQL database password */
define('DB_PASSWORD', 'replace by your password which used for sign in your host cpanel');
/** MySQL hostname */
define('DB_HOST', 'replace by your host name');
If you don't know how to do it correctly, this is the example:
// ** MySQL settings - You can get this info from your web host ** //
/** The name of the database for WordPress */
define('DB_NAME', 'b10_9063603_technews');
/** MySQL database username */
define('DB_USER', 'b10_9063603 ');
/** MySQL database password */
define('DB_PASSWORD', 'abcdef02');
/** MySQL hostname */
define('DB_HOST', 'sql24.byethost2.com');
Then you save it.
OK. Now we upload all of these files and folders in this package to host.
Byethost provided us the tool File Manager for uploading to host. But I think you should use FireFTP - an addon of Firefox, running on Firefox browser. You can download this addon here.
After you install this addon to your Firefox, then click on Webdeveloper/FireFTP for open the new tab FTP. You must creat the new account FTP tab then press OK:

When you login successfully your account, you will see the folder which same the name of your domain. Open this folder you will see the subfolder is htdocs. Because this is the Root Directory, so you do not delete it. You will upload all of folders and files which you edited above on this folder htdocs. Picture below is after you upload all of the folders and files on folder htdocs:

After you upload finished, you should check all of folders and files, may be in upload process some files were not uploaded.
Now you can install your wordpress.
Open your browser, type on address bar: http://www.yourdomain.net.ms/wp-admin/install.php then enter.
After that, the welcome screen of Wordpress will appears:


Congratulations! Now you have the new wordpress site with your own domain and host total free!! Write something and sharing with your friends!!
Note: the free host good for the blog. If you want create the bigger website which has many visitors/day, and need more bandwith, I think you should choose the paid hosting. Now there are many trusted hosting providers. I have a recommendation for you. This is the 1# hosting provider now!

Subscribe to:
Post Comments (Atom)


No comments:
Post a Comment
Interesting? Please leave a comment here: